READ THIS ENTIRE DOCUMENT THOROUGHLY UPON RECEIVING YOUR Skiplap.
This Skiplap installation guide is provided as a reference. The installer is responsible for the proper installation of this product. The products must also be installed in strict accordance with all applicable building code requirements and other regulations. Skiplap is not intended for exterior use, it is intended for use in normal, dry interior environments only.
RECEIVING
Orders are shipped freight prepaid by Common Carrier. If your order arrives damaged due to shipping, note the damage on the freight bill before signing, take pictures, and contact Sustainable Lumber Co. immediately. Do not un-bundle your order and do not proceed with the installation.
INSPECTING
Before installation inspect your product to ensure it meets your expectations. If you discover any damage, color does not match your order, or for any reason, you are not satisfied with the material, contact Sustainable Lumber Co. immediately. Sustainable Lumber Co. accepts no responsibility for costs incurred if installed with visible defects. Commencement of work by the installer is considered an acceptance of the product. Installed paneling is deemed to be visibly acceptable. Since wood is a product of nature, standard industry practice allows for up to 5% of paneling provided to have milling, handling, finish and/or grade defects.
STORAGE/ACCLIMATION
As wood is hygroscopic it responds to changes in temperature/humidity. Store materials in a clean, dry area indoors on a flat, level surface. Do not store boxed directly on concrete or near an outside wall. These wood planks need adequate acclimation for moisture equalization before installation. Acclimation can be facilitated by opening the packaging and separating the planks into smaller lots. Store the paneling in the properly conditioned installation area for a minimum of 72 hours before installation to allow paneling to adjust to room temperature.
JOB SITE REQUIREMENTS
Before installation, the installer must ensure that the job site and substrate meet the requirements of these instructions. Sustainable Lumber Co. accepts no responsibility for paneling failure resulting from unsatisfactory job site conditions and/or substrate conditions. All work involving water or moisture should be completed before installing wood paneling. For any new construction or remodeling project, wood paneling should be one of the last items installed. HVAC systems must be operational and control site temperature and humidity. Area to receive paneling [and adhesive] must be properly conditioned at normal occupancy temperature (60-70ºF (15-21ºC), and humidity levels (35-55% humidity), maintained for a minimum of one week before installation as well as during and continuously following the installation. Do not install in areas subject to moisture.
 INSTALLATION
TOOLS REQUIRED:
~ Stud Finder
~ Pencil
~ Level
~ Nail gun with finish nails
~ Miter saw
~ Table saw
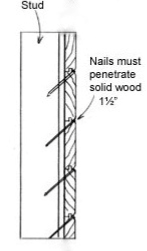
Mark all the studs on the walls, using your stud finder. Mark them with vertical lines, floor to ceiling, using a level and pencil. Position the plank so the tongue is facing up. Shoot finish nails through the tongue at wn angle at each point where it crosses a stud (based on the vertical lines you drew on the wall). The cutoff piece from your last board in that row becomes the starter piece for the next row. Set it on top of the first plank, locking together the tongue and groove. Shoot nail through the tongue of the board, at a downward angle at each point where it crosses a stud. (This will hide the nail heads, as the next board will cover them). Repeat the process for each new plank, building up the wall. Cut the top plank along its length on a table saw so it fits near the ceiling.